Alight Motion
How to Create Professional Animations in Alight Motion: Beginner’s Step-by-Step Guide
Animation has become an important part of modern video editing. Content creators use animated text, smooth transitions, and creative effects to make their videos more attractive. You can see these animations in YouTube Shorts, Instagram Reels, gaming edits, and promotional videos.
Alight Motion is a popular mobile application that helps users create professional-looking animations directly on their smartphones. It provides useful tools for motion graphics, keyframe animation, text editing, and visual effects. Beginners can also use these features to improve their editing skills.
In this guide, you will learn how to create professional animations in Alight Motion step by step. We will cover project settings, layers, keyframes, transitions, effects, and export options.
What Is Animation in Alight Motion?
Alight Motion is a mobile editing application designed for creating animations and motion graphics. It allows users to animate different elements, including text, images, shapes, and videos.
The application uses keyframes to control how objects move and change over time. You can adjust their position, size, rotation, and opacity to create different animation styles.
Types of Animations You Can Create
You can create several types of animations with the application:
- Text animations for titles and captions.
- Logo animations for brands and businesses.
- Image animations for social media posts.
- Motion graphics for promotional videos.
- Gaming animations for highlight edits.
- Transition animations between video clips.
These options make Alight Motion useful for beginners and experienced content creators.
Step 1: Download and Open Alight Motion
Before creating your first animation, you need to install the application on your smartphone. Android users can download it through Google Play, while iPhone users can find it in the Apple App Store.
After installation, open the application and explore its main interface.
Understand the Main Interface
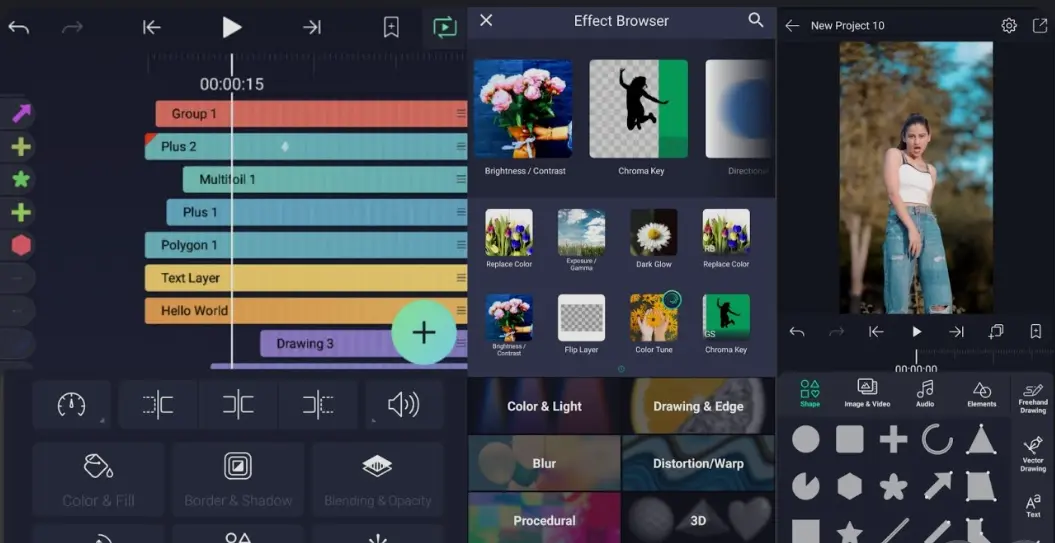
The interface includes different editing sections that help you manage your projects.
- Timeline: Controls the timing of different elements.
- Layers: Organizes images, videos, text, and shapes.
- Preview Screen: Shows your current animation.
- Editing Tools: Provides options for adjusting elements.
- Export Options: Helps you save your completed project.
Spend a few minutes exploring these sections before starting your first project.
Step 2: Create a New Animation Project
The next step is to create a new project. Open Alight Motion and select the option to start a new project.
Choose the settings according to your animation requirements.
Recommended Project Settings
For social media content, you can use these settings:
| Setting | Recommended Value |
|---|---|
| Aspect Ratio | 9:16 |
| Resolution | 1080p |
| Frame Rate | 30 FPS |
| Background | Black or Custom |
| Format | MP4 |
A vertical 9:16 project works well for YouTube Shorts, Instagram Reels, and TikTok videos.
For landscape videos, you can choose a 16:9 aspect ratio instead.
Step 3: Add Images, Text, and Shapes
After creating your project, start adding creative elements. You can import images, videos, and audio files from your smartphone.
You can also create shapes and add text directly inside the application.
How to Add Text
Follow these simple steps:
- Open your project.
- Select the text option.
- Enter your required words.
- Choose a suitable font.
- Adjust the text size and color.
- Place the text on the preview screen.
Try to use clear fonts and readable colors. Avoid adding too much text to one screen.
How to Add Images and Shapes
You can import images from your gallery or create basic shapes using the available tools.
For a professional appearance, use high-quality images and keep your design simple.
Step 4: Learn Keyframe Animation
Keyframes are one of the most important tools in Alight Motion. They allow you to control how an object changes over time.
For example, you can make a text element move from the bottom of the screen to the center. You can also change its size, rotation, and transparency.
How to Create a Basic Keyframe Animation
- Select the text or image layer.
- Move the timeline marker to the starting position.
- Add your first keyframe.
- Move the timeline marker forward.
- Change the object’s position or size.
- Add another keyframe.
- Play the animation to check the movement.
The application creates movement between the selected keyframes.
Tips for Smooth Animation
- Avoid making objects move too quickly.
- Use suitable spacing between keyframes.
- Keep movements natural.
- Experiment with different animation speeds.
- Preview your animation before exporting.
Learning keyframes will help you create more detailed animations.
Step 5: Use Smooth Transitions
Transitions make your videos look more connected. They help move smoothly from one scene to another.
Alight Motion provides different animation and effect controls that you can use to create creative transitions.
Popular Transition Styles
Here are some transition ideas for your projects:
- Zoom transition.
- Slide transition.
- Fade transition.
- Rotation transition.
- Blur transition.
- Shake transition.
Choose transitions that match your video style. Using too many effects can make your content look confusing.
Step 6: Add Professional Visual Effects
Visual effects can improve the appearance of your animations. They help create attractive designs and make important elements stand out.
Alight Motion provides several effects that you can experiment with in your projects.
Useful Effects for Beginners
1. Blur Effect
Blur creates a soft appearance and can help direct attention toward important objects.
2. Glow Effect
Glow adds a bright appearance around selected elements. It works well for gaming edits and animated titles.
3. Shadow Effect
Shadows create depth and make text or objects easier to distinguish from the background.
4. Color Adjustment
Color adjustments help improve brightness, contrast, and overall visual appearance.
5. Distortion Effect
Distortion changes the appearance of an object and can create interesting visual styles.
Use these effects carefully to maintain a clean and professional design.
Step 7: Create Animated Text
Animated text is popular in motivational videos, gaming edits, and social media content. It helps communicate important messages in an interesting way.
You can animate text by changing its position, size, rotation, and opacity with keyframes.
Ideas for Animated Text
- Create moving motivational quotes.
- Animate video titles.
- Make subtitles appear smoothly.
- Add animated introductions.
- Highlight important words with different colors.
For better results, use simple fonts and maintain consistent text styles throughout your video.
Step 8: Add Music and Sound Effects
Audio makes animations more engaging. Background music and sound effects can improve the overall viewing experience.
You can import audio files into your project and adjust their timing according to the animation.
Audio Editing Tips
- Choose music that matches your video theme.
- Keep background music at a suitable volume.
- Use sound effects for important movements.
- Synchronize animations with music beats.
- Avoid unnecessary audio effects.
Always use music and sound effects that you have permission to use.
Step 9: Preview and Improve Your Animation
Before exporting your project, watch the complete animation carefully. Check whether the text, images, transitions, and audio work correctly.
Final Editing Checklist
- Check text spelling.
- Review animation timing.
- Remove unnecessary effects.
- Check background colors.
- Make sure audio is clear.
- Confirm that all elements appear correctly.
- Preview the complete project.
Small improvements can make a big difference in the final result.
Step 10: Export Your Professional Animation
After completing your editing work, export the project to save your animation as a video.
Choose the appropriate resolution, frame rate, and file format according to your needs.
Recommended Export Settings
| Setting | Recommended Value |
|---|---|
| Resolution | 1080p |
| Frame Rate | 30 FPS |
| Format | MP4 |
| Quality | High |
| Aspect Ratio | 9:16 for Shorts and Reels |
Higher resolutions and frame rates may require more processing power and storage space. Check the exported video before uploading it to social media.
Best Tips for Creating Professional Animations in Alight Motion
Creating professional animations requires practice and creativity. You do not need to use every available effect to make an attractive video.
Important Tips for Beginners
- Keep your animations simple and clean.
- Use high-quality images and graphics.
- Learn keyframe controls properly.
- Choose readable fonts.
- Use consistent colors.
- Match transitions with your content.
- Avoid unnecessary visual effects.
- Practice with short projects before creating longer videos.
Following these tips can help you improve your animation quality over time.
Common Mistakes Beginners Should Avoid
Many beginners make small mistakes when learning animation. These mistakes can affect the final appearance of their videos.
Common Editing Mistakes
Using Too Many Effects: Too many effects can make a video look messy. Use only the effects that improve your design.
Poor Keyframe Timing: Incorrect timing can make object movements look unnatural. Adjust the distance between keyframes.
Unreadable Text: Very small fonts and poor color combinations make text difficult to read.
Low-Quality Images: Blurry images reduce the overall quality of your animation.
Ignoring Export Settings: Incorrect export settings can affect video quality and playback.
Avoiding these mistakes will help you create cleaner and more attractive projects.
Final Verdict
Alight Motion is a useful mobile application for anyone who wants to learn animation and motion graphics. It offers keyframe controls, multiple layers, text customization, transitions, and visual effects.
Beginners can start with simple projects and gradually explore advanced editing techniques. By following the steps in this guide, you can create animated text, moving images, creative transitions, and social media videos.
The most important thing is regular practice. Experiment with different tools, improve your timing, and develop your own editing style. With patience and creativity, you can create professional-looking animations directly on your smartphone.
Frequently Asked Questions (FAQs)
1. Is Alight Motion good for beginners?
Yes, Alight Motion is suitable for beginners. Users can start with basic editing tools and gradually learn advanced animation techniques.
2. How do I create animations in Alight Motion?
Create a new project, add text or images, use keyframes to control movement, apply effects, and export your completed animation.
3. What are keyframes in Alight Motion?
Keyframes control changes in an object’s position, size, rotation, and opacity over time.
4. Can I create 3D-style animations in Alight Motion?
You can create some 3D-style visual effects using available animation and editing tools. However, it is not a full 3D modeling application.
5. What is the best resolution for Alight Motion videos?
1080p is a good choice for most social media videos. You can select other supported resolutions according to your project requirements.
6. Can I create YouTube Shorts with Alight Motion?
Yes, you can create vertical 9:16 animations and export them for YouTube Shorts.
7. Does Alight Motion support text animation?
Yes, you can animate text using keyframes and customize its movement, size, rotation, and opacity.